Luminar Review

When it comes to image editors for professional photographers, Luminar has made its mark over the past few years in the space. This has been a highly-rated software that offers everything you would expect from a professional image editor but at a fraction of the price of names like Lightroom and Capture One. It also works fast, produces excellent results, and has a host of features that set it completely apart from a usability point of view.
The company behind Luminar has recently launched a brand new version of its image editor. Dubbed Luminar AI, this is a revamp of the software from its previous version. It promises even better editing and processing speeds, top-notch editing prowess powered by artificial intelligence, and various new tools among a lot more. All of these improvements make Luminar AI worth exploring for any photographer out there who isn’t happy with the monthly fees they have to pay for Lightroom or the chunky price tag that Capture One boasts. At a one-time price of $79, Luminar AI can give those editing giants a run for their money.
Let’s take a look at this brand-new software and go over its various features to give you a better idea of whether you should give it a try or not.
Improved Usability
The first changes you’ll notice if you’ve used Luminar before this update are in the department of usability. The Skylum team has worked very hard to make the experience of editing images as seamless and intuitive as possible. Many common bugs have been squashed and new features and quality of life improvements have been added.
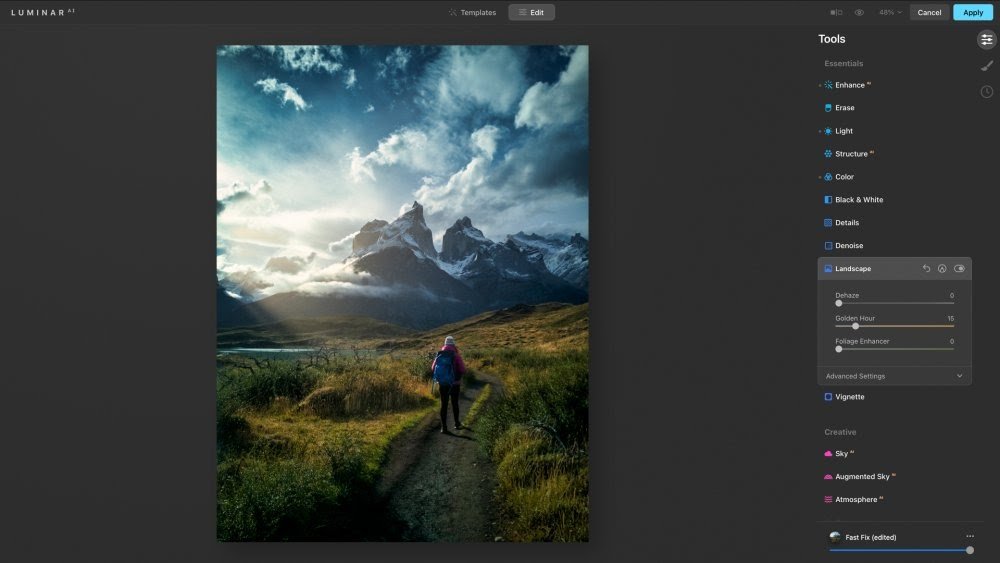
- The main Edit panel has been improved to include all of the tools in a singular list. The icons for the various tools in different categories like Composition, Creative, and Portrait are color-coded so you don’t get lost in the long list. This has made it easier to locate your required tool without having to look for it in multiple places.

- When it comes to image management, Luminar AI has made it very easy. There are 4 simple and easy-to-navigate workspaces including Catalog, Templates, Edit, and Export. Each of these has its own functionality when you click on the corresponding icons. There is no need to navigate through multiple menus and tabs to find what you need thanks to this change.
- Another excellent thing about image management in Luminar AI is that any image that you add to a folder on your computer will automatically show up in the Luminar catalog if you have already included that folder in the catalog. That is excellent because it does away from having to drag and drop images into the Luminar catalog when you want to edit them. If they’re on an included folder, they will show up within the software. Simple!
Excellent Templates
As far as filters are concerned, photographers tend to steer clear of them because of their generally bad reputation. That is because most filters included in other editing software blindly add a specific set of edits on your images, without paying any regard to what the photo actually needs. This is where Luminar AI’s ‘Templates’ are different.
Using the power of AI, these Templates analyze your image and then suggest the best edits you can use. They then apply a whole lot of micro-edits to the image based on certain algorithms. These are not your usual VSCO presets but vary based on what is in your image. These Templates have been one of the highlights of Luminar for a very long time, and they have been improved for this new version.

When you choose which Template you wish to use from the suggested ones, you then get a handful of sub-Templates as possible choices. These fine-tune the look of your image based on what you wish to make the photo look like. You can increase or decrease the ‘opacity’ or ‘power’ of the Template based on your preference. While it may not always work perfectly, this feature is one of the best ones in this software especially for enthusiasts or casual photographers who want to make quick edits for sharing their work on social media.
Use as a Plugin
For professional photographers who are heavily invested in Adobe Photoshop and Lightroom, it may not be feasible to drop everything and make the move based on a Luminar AI review, no matter how enticing its features and tools may be. The good news is that they don’t need to. They can simply purchase Luminar AI and add it as a plugin to either Lightroom or Photoshop! This gives them the best of both worlds. They can maintain their existing workflow and then use one of Luminar’s powerful tools when they need to.
Once installed as a plugin, for example in Photoshop, you can locate Luminar in the ‘Plugins’ tab. Upon selecting it, you will be greeted with a whole host of editing tools that you can use to edit your images before returning back to the Photoshop interface.

You can use the Luminar plugin even on Apple’s Photos app that comes preinstalled with macOS.
Unique AI-Powered Tools
No Luminar AI review would be complete without talking about perhaps the most impressive features of this software – the AI-powered tools. These are the tools that have the ability to wow even pro photographers because they can completely change the look of an image within a matter of seconds. Imagine having to change the sky in your image with a complicated foreground, or adding or enhancing reflections in the water, or something similar. It can sometimes take hours to get done. But with Lumiar AI’s magic, all it usually takes are a couple of clicks.
Let’s take a look at some of these tools to see what they can actually do.
Sky AI
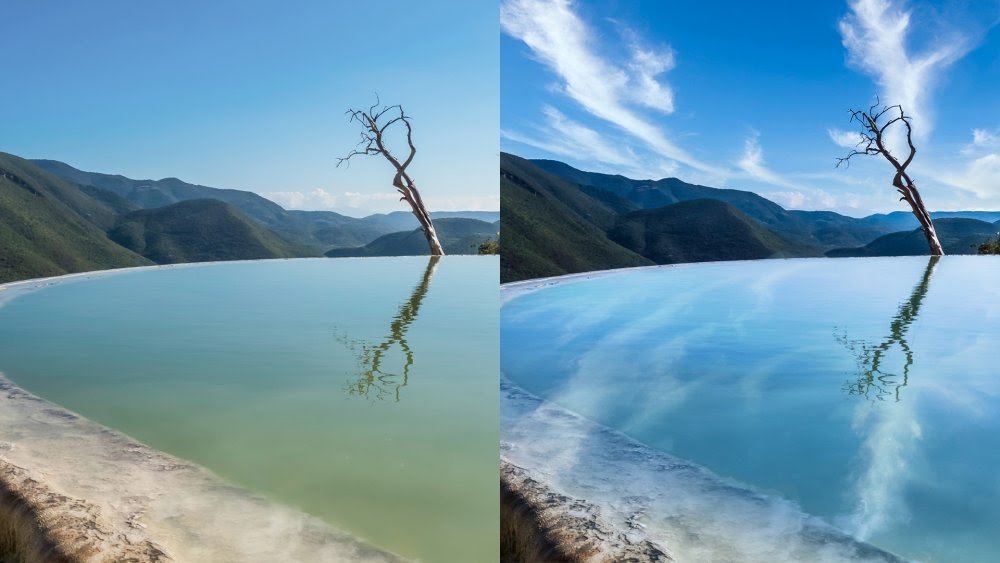
Have you ever tried changing the sky in a photo? It can be quite tedious to do, right? You can spend a very long time trying to mask the image perfectly and then change the overall color tone of the image to match the sky or vice versa. Now, add to that complexity the need to add the sky’s reflection in a body of water and you have a task that can take a very long time and still not look natural.
Well, with Sky AI, this software can do all of that for you! All you need to do is select the sky you wish to be in your image and the software will do the rest. If there is a reflective surface, like a lake, in your image then the sky will automatically be reflected in it too. For water bodies, the software will even add ripples on the water surface for more realism.
Scene Relighting
One of the biggest challenges that come when you replace the sky in a photo is having to adjust the overall colors so that everything looks natural. The specific Relight tools in Luminar AI help you control these aspects of your images with ease. These tools include Relight Amount, Relight Saturation, and Relight Human. These slider-based tools allow photographers to control just how much of a color cast is created by the new sky, helping them adjust the tone of the overall scene and the subject.

Atmosphere AI
If you wish to add realistic effects like fog, haze, and mist to your landscape images, this tool makes it a matter of a few seconds. Where you would have to edit individual elements in something like Photoshop, Luminar handles everything for you.
Body AI
For those who shoot portraits or fashion photos, Body AI can be a great tool to realistically add or remove some weight from the model. This is also an excellent tool to fix any distortion that might creep in your images because of using a wide-angle lens.
Composition AI
For photographers who want to quickly edit their images for social media, Composition AI can give them ideas for a better crop. While many serious photographers may not use this feature, it can be helpful for a newbie who’s learning compositional techniques.
Accent AI
To make photos look more punchy without look artificially edited, Accent AI is a great tool. It boosts the colors and adds some natural exposure to the images. Like other AI tools on Luminar, it doesn’t just slap every image with the same settings but rather works on different images in unique ways.
Portrait Tools
There are a number of separate tools that focus on portrait photography. The most obvious of these is Face AI. It helps enhance the lips, whiten teeth, lighten the face, and remove dark circles without any masking required. Another great option is Skin AI which helps to remove blemishes but preserves the pores to keep the faces looking natural.
To change how the eyes of your subject look, the Iris AI tool will be useful. It can change the shape and color of the subject’s iris while also being able to make it bigger or smaller.
Texture Overlays
Adding special effects to images has been made with Texture Overlays. You can add anything on top of an image in the form of a PNG file containing textures, watermarks, text, or anything else you want. This is a great way to make images your own in a creative way.

Golder Hour
How about making your shots look like they were taken during the golden hour? This tool relights your images in a very convincing way to make them look like you took them at the perfect moment, even if you didn’t!
Structure AI
Another tool worth mentioning in our Luminar AI review is Structure AI. Unlike the usual clarity and sharpness sliders you see in other editors, this tool helps add some depth to photos and boost details naturally. It can recognize different parts of an image like people, skies, and water to make localized changes rather than washing the whole image with a fake clarity.
And More
There’s a lot of other AI-based tools part of this excellent photo editor. Each of them does something unique to make your image editing workflow simpler and quicker. While you may find one of two of the tools more gimmicky than useful, there’s a whole lot that is going to change the way you edit.
Tools for Manual Masking
If you feel like you are losing some control by using all the cool AI-powered tools, don’t worry! The advanced masking tools in Luminar AI allow you to control exactly what part of your images gets affected by the tools you are using. In this way, they do much more than the traditional masking tools in other programs. With these, you could erase the effect of a certain tool from a part of the image. For example, if you take a group shot and then apply the Face Light tool to make the faces brighter, you could remove the effect from a couple of faces that you feel don’t need it. Because of this kind of control, you will never feel like your images are completely in the software’s hands.

Speed of Use
One of the biggest reasons why many of the new photo editors don’t work out for a lot of pro photographers is that they are noticeably slower than the giants in the market. Luminar 4 had similar issues where it would feel a little sluggish. Luminar AI, though, has been created from scratch as a brand new software and is much more lightweight and less resource-hungry. This means that it is very fast.
Making edits using the Templates happens almost right away – a task that would often cause the program to slow down before. There are no delays when using the AI-powered tools which are arguably some of the most advanced tools in the software. This just goes to show how well-optimized this editor is. There are some small delays here and there, like when switching from one photo to another, but they can be seen in other similar programs too and can be forgiven. The overall speed, however, has been significantly increased in this version.
Other Small Improvements
All the other tools you’d expect a fully-featured image to have are also here. A lot of them have been improved over the previous versions. The Dodge & Burn tool is one example of these. Not only does it allow you to control the highlights and shadows in certain parts of your images, it now comes with a new Softness control that you can use to soften the edges of the area you’re editing for an overall natural look.
And Of Couse, All The Usual Tools
Other than all of these great improvements over Luminar 4, Luminar AI also comes with all the editing tools you would need. Dubbed as the Essential Tools, these include everything from exposure control, saturation, white balance, sharpness, and more. All of these editing tools have their own tab, Essentials, which has multiple options like Light, Color, Details, etc. Upon clicking on each of these options, you are presented with various controls and sliders to adjust each aspect of your image to perfection. With all of the fancy AI stuff going on, these basic editing tools can sometimes get lost in a Luminar AI review but they have to be mentioned as they are all great at what they do.

What’s Not So Good?
This wouldn’t really be a good Luminar AI review if we didn’t discuss some of the program’s shortcomings, as every program has. While the overall experience is great, there are some things that could be improved.
- It’s not possible to rename files when batch exporting.
- You cannot compare images side by side.
- Layer-based edits are missing.
- Watermarks cannot be added to exports and you have to use them as a Texture layer.
- While images are being exported, you have to wait before editing another file.
- You cannot label, star, and tag files or add keywords.
- Batch editing multiple photos is not possible.
- Some of the more advanced controls are a little hard to find.
Despite these issues, it must be noted that if you plan on using this editor as a plugin to Lightroom, then you won’t face most of them. You could edit a file in Lightroom, take it into the Luminar plugin and make all the changes you wish, and then bring it back into Lightroom for the final export. But you should keep these cons in mind if you’re planning to use Luminar AI as a standalone editing software.
Who Should Use Luminar AI?
This particular photo editor is very good, there’s no doubt about that. It brings the features from other RAW editors that you’d want in pro-grade products like local adjustments and masking tools and then combines them with AI-powered wizardry to give you a unique editing experience. Because of that, anyone who wants to save hours of editing can use Luminar AI. However, there are still some people whom this software will suit more than others. These include:
- Photographers who like to convert their images into something completely different. With tools like Sky AI, it makes the whole process much easier for someone who wants to make a typical sunny Tuesday look like a scene from Lord of the Rings.
- Beginner photographers who are not yet experienced enough to know how to edit their images nicely and don’t know what various manual controls do.
- Portrait photographers want to save precious time that they would otherwise spend on retouching their images. The portrait-based tools are excellent for doing everything that a photographer would spend a very long time doing in Photoshop.
- Users who are not happy with making complex adjustments manually in Lightroom or another software.
- Professional photographers who are happy with Lightroom and/or Photoshop but want to add some unique tools to their editors and save time.
Who (Maybe) Shouldn’t Use Luminar AI?
This program might not be very well-suited to those photographers who are looking for a complete replacement for Lightroom and need to edit thousands of images within one software. Managing a lot of images is still among one of Lightroom’s biggest benefits so you might be more comfortable with that. And for those people who love manually adjusting details in their shot like retouching portraits, the AI-powered tools might feel like they don’t offer enough control.
However, there’s nothing stopping you from adding Luminar’s plugin to Lightroom in any of these cases if you’re into experimenting with new tools or making quick and easy edits from time to time.
Final Verdict
To wrap up our Luminar AI review, all we can say is that this is quite a unique photo editor that’s not going to be everyone’s cup of tea. However, despite the fact that not everyone would be very comfortable with letting AI take care of their images, it’s still an editor that should in the arsenal of pro photographers who wish to make their lives a little easier. The tools it has are simply amazing at what they do when they work. There are times when these tools will not work perfectly but it won’t happen so often. But when they do work, they can save you hours of manual editing and adjustments. Whether you need to replace the sky or make the irises of your model pop, Luminar can get it done with a single (or a few) simple clicks.
For enthusiast photographers and those who share their work only on social media and can’t be bothered to learn manual editing in detail, this might just be the perfect editor. Using its Templates can completely change the way your images look without making them look artificial. You can either alter the image’s feel altogether or add just a little kick to it for some added depth and color. If you’re not happy with other editing apps’ presets and ‘filters’, then the Templates are going to be a huge step up from them.
And finally, even if you don’t want to switch from your existing workflow, using Luminar as a plugin is still a very good idea. You will get to work with the software you’re comfortable with while getting some of the very helpful tools that this editor brings to the table. All in all, Luminar AI is a big improvement over the previous version by Skylum and it can make big changes to how you edit your images if you use it right.
 Next Post